


Overlay Mosaic Crochet 101 | In Rows with the Continuous Method
Step-by-step instructions and video tutorials to work in rows with the Continuous Method

What is the Continuous Method
This method, developed as far as I know, by Susan Lowman, “The Crochet Architect”, is a way of solving the big drawback of overlay mosaic crochet worked in rows: the need to cut the yarn at the end of each row. The author calls it the Continuous Overlay Mosaic, or COM for short.
You can watch here the video where Susan Lowman shows the method. On her YouTube channel, The Crochet Architect, you can find many very useful tutorials on different crochet techniques.
The more traditional method has its uses (if we want our project to have a fringe, for example), but not having to cut the yarn on every row opens an entire range of creative possibilities with overlay mosaic crochet, makes the process smoother and the end result cleaner.
Another advantage is we waste less yarn (if we make a mistake and need to frog it, or if we’re developing a new project and want to undo something and make changes). On the other hand, it can also consume more yarn because we have to take it from the end of a row to the begining every time we start a new row, across the entire width of the fabric.
For me, the advantages are worth it, but each method has its applications.
Some preliminary notes
I started using the Continuous Method as Susan Lowman shows it. With pratice and some experimentation, I made a few changes to her original version. These changes work best for me and the type of patterns and projects I usually make, but you can also check her videos and choose what you prefer.
To better understand those differences (which you can adopt only partly), they are:
Anchored double crochet: I make a simplified version, with less movements and less yarn, which makes the stitch less bulky than the standard version.
The way I attach the yarn at the beginning of a row and make the first stitch is also slightly different.
The first and the last stitch of the row: my patterns may ask for double crochet stitches instead of only single crochets, as in the example made by Susan on the video I share above.
Finishing off each row: after finishing off a row as shown by Susan, I make an extra step, which is pulling the ball of yarn through the loop made by the yarn of the previous row, before pulling it to adjust it to the width of the fabric (I know this probably doesn’t make any sense right now, but you’ll understand when we get there!).

Components of the Continuous Method
When starting, it may seem difficult, but it’s actually quite simple. All you need to do it keep in mind the steps you need to take and, after some practising, you’ll see you’ll get used to the movements and will start enjoying the process.
What you need to know and keep in mind:
how to finish off each row and transitioning to the next;
how to begin each row;
single crochet stitches are always what I can “mosaic single crochets” (i.e., always on the back loop of the stitches of the previous row); by default, this is valid for all my projects in overlay mosaic crochet (instead if stated otherwise);
mosaic double crochet stitches are always anchored (i.e., anchored on the back loop of the stitches of the previous row, and made on the front loop of the stitches two rows below); you can make the simplified version or not; by default, I always make the mosaic double crochets anchored and simplified, even if the project is worked in the round.
Let’s now see each of these elements step-by-step.
(You can change the speed of the videos as needed on the 3 vertical dots at the bottom right corner of each video.)
PS: These tutorials and all my patterns and resources in English use US terms.

Video-tutorials and step-by-step instructions
Fastening off the first row
This is the first thing to do after making the last stitch of a row, and it’s done on every row.
After making the last stitch, open the loop on the hook enough to pull the yarn ball through it (you can use the hook to widen the loop or do it using your fingers).
Pull the yarn ball through that loop, upwards, and tighten it.
On the first row, after tightening the loop, you just need to take the yarn of the row you just finished to the beginning of the row, leaving some of it hanging* on your left, and you’re ready to start a new row.
Notes:
From the second row onwards, you’ll have other steps before taking the yarn to the beginning of the row. You’ll now have a hanging loop on the left, made by the yarn of the previous row and that you hid across the present row. You’ll have to pull the hidden yarn from the previous row on your right to adjust it to the width of the fabric, until that loop is not hanging anymore on the left.
*When in doubt, better to leave this loop too loose than not loose enough. It will get shorter as you make the stitches of the next row and you’ll need that loop wide enough to pull the yarn ball through.

Starting a new row
At the beginning of each row, we first attach the new yarn/colour. We do it by pulling the yarn through the back loop and then making a chain, being careful to use this to secure the yarn from the previous row right from the start. This step is the same at the beginning of every row.
Then, we make a mosaic single crochet exactly on the same spot.
From the third row onwards, the pattern may ask for an anchored mosaic double crochet. In this case, the double crochet is anchored on the back loop of the first stitch (same spot where we attached the new yarn and made a chain), and made on the front loop of the first stitch two rows below.
We make mosaic single crochets (on the back loop) until the end of the row, always around the yarn of the previous row so that it’s hidden all across the width of the fabric (the same goes to all rows, regardless of what specific stitches the pattern asks for).
It’s easy to mistake the last stitch of a row with the knot where we fastened off the previous row; be careful not to add a stitch here.
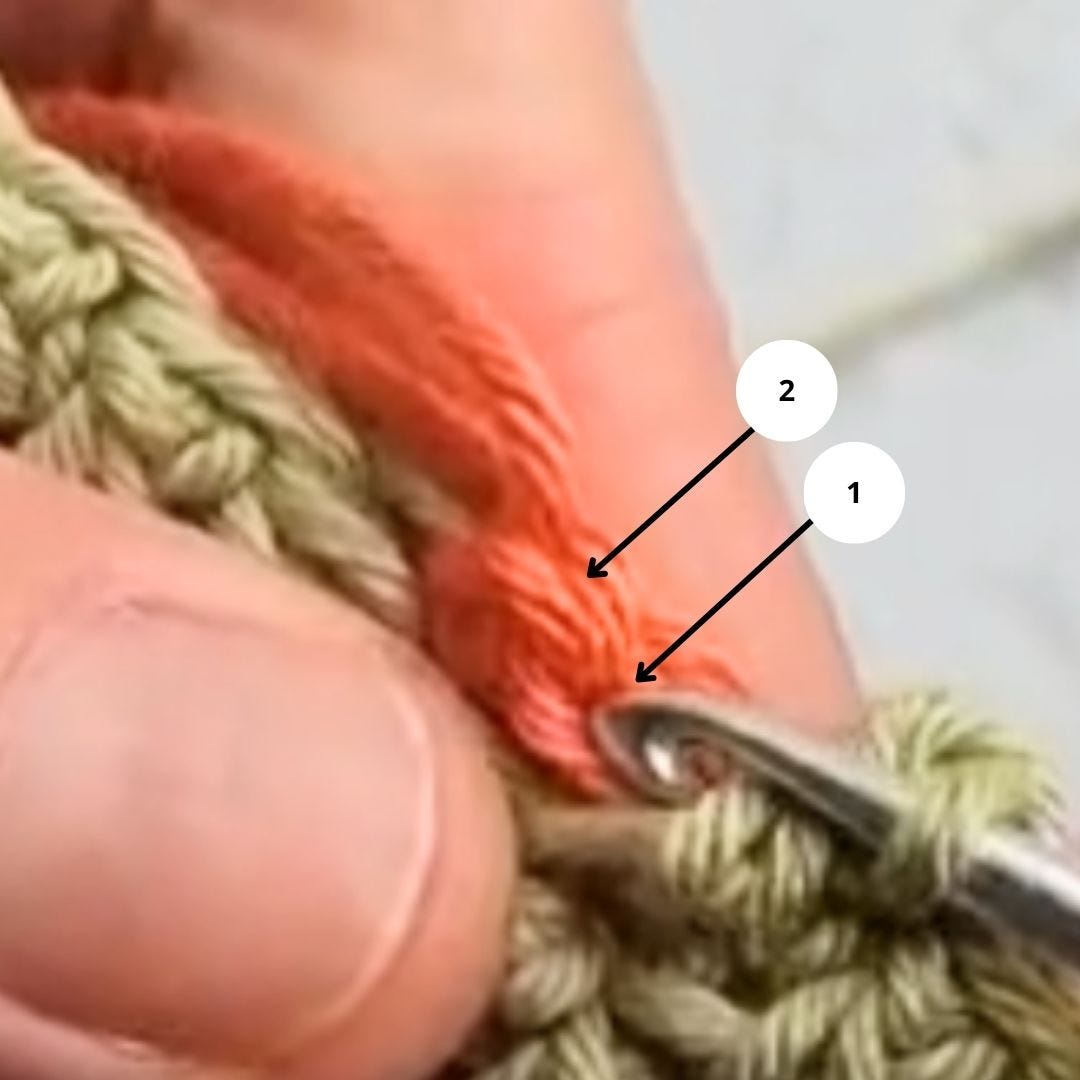
Back loop of the last stitch of the previous row, the place where we make the last mosaic single crochet or where we anchor the last mosaic double crochet, depending on what the pattern asks for.
Knot from the fastening off of the previous row: do not make any stitch here!
Notes:
Be careful to hide the yarn of the previous row from the beginning until the end of the new row.
On the video, you can see I took the opportunity to also secure and hide the end of the new yarn with the first stitches. You can do the same or not.

Fastening off and finishing the second row and the following rows
From the second row onwards, we have a hanging loop to the left of the fabric, from the yarn of the previous row, and that we hid across the present row. This means that, before starting a new row with that same yarn, we have to pullI it so that the loop is adjusted to the width of the fabric and is no longer hanging.
It’s at this stage that I added an extra step, which is optional. I started doing it always like this because I prefer how the sides look, more perpendicular to the rows, and with a more even tension across the whole width.
After making the last stitch, open the loop on the hook, pull the yarn ball through the loop upwards, and tighten it.
Now, take the same yarn ball and push it downwards through the hanging loop of the previous row.
Pull the yarn of the previous row (on your right), little by little, straightening the fabric as the hanging loop of the previous row gets smaller, until it’s adjusted to the width of the fabric and the loop is barely visible.
Straighten the fabric so that the stitches are relaxed and not too tug, and the row you just made is the same width as the previous rows as much as possible.

Anchored mosaic double crochet (simplified version)
As a general rule, with overlay mosaic crochet, we only start making double crochets on the third row or round.
This is valid for any overlay mosaic crochet, be it in rows or in rounds, because:
only from the third row/round do we have one with single crochets in a different colour (the second row/round or even-numbered rows/rounds), which we’ll be able to cover with mosaic double crochets,
and one with single crochets of the same colour (the first row/round or odd-numbered rows/rounds), to which we’ll be able to connect to with mosaic double crochets to create a continuity of colour.
Pull the yarn through the back loop (this will anchor the stitch and also serve as the first yarn over of the double crochet).
Put the hook through the front loop of the stitch two rows below, and pull up a loop (pull enough so that it’s long enough to be at the height of the row you’re making).
Yarn over and pull through the first two loops on the hook.
Yarn over again and pull through the remaining two loops on the hook.
Note: the two major differences from the simplified version to the standard version is that, with the simplified version, we don’t make a yarn over right after anchoring the stitch and, this way, we only have two instead of three loops on the hook for the last yarn over.

Keep in mind
At the end of every row, fasten off the last stitch by pulling the yarn ball upwards through the loop that was on the hook.
Optional: from the second row onwards, besides this fastening off, you’ll push the same yarn ball downwards through the hanging loop to your left, made from the yarn of the previous row.
Before starting a new row, push the yarn you’ll be using and that you hid across the last row, until the hanging loop to your left is adjusted to the width of the fabric (stretch and move the fabric around so that the width is as even as possible).
After each row is fastenen off and finished, take the yarn of that row to the beginning, leaving a hanging loop to the left of the fabric.
To begin a new row, pull the new yarn through the back loop of the first stitch and make a chain, securing the yarn of the previous row from the start; then, make the first stitch (single or double) exactly on the same spot.
Single crochets are always mosaic single crochets, i.e., always made on the back loop.
Double crochets are always anchored mosaic double crochets, i.e., you always begin by pulling the yarn through the back loop of the previous row (different-colour row) to anchor it, and make the stitch on the front loop of the stitch two rows below (same-colour row).

Projects using the Continuous Method
The Continuous Method opens up a whole range of creative possibilities with overlay mosaic crochet in rows. Just to give you an idea, here are a few pieces I’ve made with this method. And no… I don’t have written patterns for them all. In fact… for barely any. But I’ll get there.


At the moment I’m publishing this, I have two available patterns, one in Portuguese and one in English. I have the “missing language” of each one in final editing mode, and I’m also working on finishing other projects.
If you don’t understand Portuguese and want to start trying all this out right away, I recommend the Potholders. It’s a free pattern on the link below, and you can always choose to buy it as a “pay what you can/want” at any time here.


PS: On this page, I’m publishing my up-to-date version of the Continuous Method, and will be revising both patterns above to reflect this version. Either way, you can always apply it to any of my present and future patterns made with the Continuous Method.
If you enjoy this type of content, think I’m offering something useful, and maybe even deserve a pat on the back, you can show your support in several ways. I appreciate them all!
Subscribe so you don’t miss anything, press the <3 button, leave a comment with questions or suggestions or whatever you feel like. And you can also share this with someone you know is eager to learn overlay mosaic crochet. ;)
